#----Glide--- start
-keep public class * implements com.bumptech.glide.module.GlideModule
-keep public class * extends com.bumptech.glide.module.AppGlideModule
-keep public enum com.bumptech.glide.load.resource.bitmap.ImageHeaderParser$** {
  **[] $VALUES;
  public *;
}

#---Glide V4.X
-dontwarn com.bumptech.glide.load.engine.bitmap_recycle.LruBitmapPool
-dontwarn com.bumptech.glide.load.resource.bitmap.Downsampler
-dontwarn com.bumptech.glide.load.resource.bitmap.HardwareConfigState
#----Glide--- end
Mastering Kotlin standard functions: run, with, let, also and apply
Some of the Kotlin’s standard functions are so similar that we are not sure which to use. Here I will introduce a simple way to clearly distinguish their differences and how to pick which to use.
Scoping functions
The functions that I’ll focus on is run, with, T.run, T.let, T.also and T.apply. I call them scoping functions as I view their main functionality as provide an inner scope for the caller function.
The simplest way to illustrate scoping is the run function
fun test() { var mood = "I am sad"
run{ val mood = "I am happy" println(mood) // I am happy } println(mood) // I am sad }
With this, inside the test function, you could have a separate scope where mood is redefined to I am happy before printing, and it is fully enclosed within the run scope.
This scoping function itself seems not very useful. But there’s another nice bit it has than just the scope; it returns something i.e. the last object within the scope.
Hence the below would be neat, where by we can apply the show() to both views as below, without calling it twice.
run{ if (firstTimeView) introView else normalView }.show()
3 attributes of scoping functions
To make scoping functions more interesting, let me categorize their behavior with 3 attributes. I will use these attributes to distinguish them from each others.
1. Normal vs. extension function
If we look at with and T.run, both functions are actually pretty similar. The below does the same thing.
In this case, clearly T.run extension function is better, as we could apply check for nullability before using it.
2. This vs. it argument
If we look at T.run and T.let, both functions are similar except for one thing, the way they accept the argument. The below shows the same logic for both functions.
stringVariable?.run {
      println("The length of this String is $length")
}
// Similarly.
stringVariable?.let {
      println("The length of this String is ${it.length}")
}
If you check the T.run function signature, you’ll notice the T.run is just using made as extension function calling block: T.(). Hence all within the scope, the T could be referred as this.In programming, this could be omitted most of the time. Therefore in our example above, we could use $length in the println statement, instead of ${this.length}. I call this as sending in this as argument.
However for T.let function signature, you’ll notice that T.let is sending itself into the function i.e. block: (T). Hence this is like a lambda argument sent it. It could be referred within the scope function as it. So I call this as sending in it as argument.
From the above, it does seems like T.run is more superior over T.let as it is more implicit, but there are some subtle advantages of T.let function as below: -
The T.let does provide a clearer distinguish use the given variable function/member vs. the external class function/member
In the event that this can’t be omitted e.g. when it is sent as a parameter of a function, it is shorter to write than this and clearer.
The T.let allow better naming of the converted used variable i.e. you could convert it to some other name.
stringVariable?.let {
      nonNullString ->
      println("The non null string is $nonNullString")
}
3. Return this vs. other type
Now, let’s look at T.let and T.also, both are identical, if we look into the internal function scope of it.
stringVariable?.let {
      println("The length of this String is ${it.length}")
}
// Exactly the same as below
stringVariable?.also {
      println("The length of this String is ${it.length}")
}
However their subtle different is what they return. The T.let returns a different type of value, while T.also returns the T itself i.e. this.
Both are useful for chaining function, where byT.let let you evolve the operation, and T.also let you perform on the same variable i.e. this.
Simple illustration as below
val original = "abc"
// Evolve the value and send to the next chain original.let{ println("The original String is $it") // "abc" it.reversed() // evolve it as parameter to send to next let }.let{ println("The reverse String is $it") // "cba" it.length // can be evolve to other type }.let{ println("The length of the String is $it") // 3 }
// Wrong // Same value is sent in the chain (printed answer is wrong) original.also{ println("The original String is $it") // "abc" it.reversed() // even if we evolve it, it is useless }.also{ println("The reverse String is ${it}") // "abc" it.length // even if we evolve it, it is useless }.also{ println("The length of the String is ${it}") // "abc" }
// Corrected for also (i.e. manipulate as original string // Same value is sent in the chain original.also{ println("The original String is $it") // "abc" }.also{ println("The reverse String is ${it.reversed()}") // "cba" }.also{ println("The length of the String is ${it.length}") // 3 }
The T.also may seems meaningless above, as we could easily combine them into a single block of function. Thinking carefully, it has some good advantages
It can provide a very clear separation process on the same objects i.e. making smaller functional section.
It can be very powerful for self manipulation before being used, making a chaining builder operation.
When both combine the chain, i.e. one evolve itself, one retain itself, it becomes something powerful e.g. below
// Normal approach
fun makeDir(path: String): File  {
    val result = File(path)
    result.mkdirs()
    return result
}
By looking at the 3 attributes, we could pretty much know the function behavior. Let me illustrate on the T.apply function, as it has not be mentioned above. The 3 attributes of T.apply is as below…
It is an extension function
It send this as it’s argument.
It returns this (i.e. itself)
Hence using it, one could imagine, it could be be used as
// Normal approach
fun createInstance(args: Bundle) : MyFragment {
    val fragment = MyFragment()
    fragment.arguments = args
    return fragment
}
Or we could also making unchained object creation chain-able.
// Normal approach
fun createIntent(intentData: String, intentAction: String): Intent {
    val intent = Intent()
    intent.action = intentAction
    intent.data=Uri.parse(intentData)
    return intent
}
// Improved approach, chaining fun createIntent(intentData: String, intentAction: String) = Intent().apply{ action = intentAction } .apply{ data = Uri.parse(intentData) }
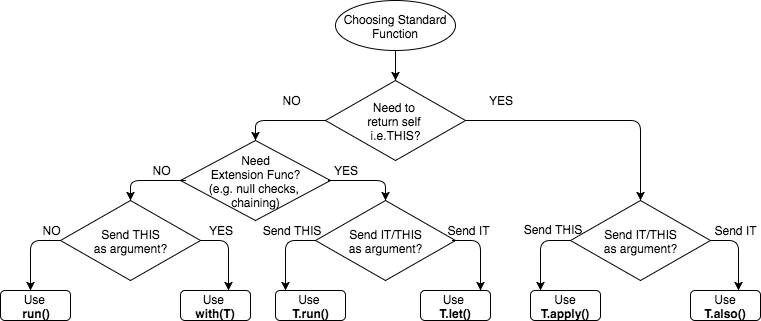
Function selections
Hence clearly, with the 3 attributes, we could now categorize the functions accordingly. And based on that, we could form a decision tree below that could help decide what function we want to use pending on what we need.
Hopefully the decision tree above clarifies the functions clearer, and also simplifies your decision making, enable you to master these functions usage appropriately.
Feel free to provide some good real example of how you use these functions as response to this blog. I would love to hear from you. This may benefits others.
I hope you appreciate this post and it’s helpful for you. Do share with others.
You could check out my other interesting topics here.
Follow me on medium,TwitterorFacebook for little tips and learning on Android, Kotlin etc related topics. ~Elye~
안드로이드 개발자라면 귀찮아도 모니터링 해야할 링크들을 모아보았습니다. 한글 사이트보다 영문이 많아 불편하실 수도 있습니다. 우리가 앞으로 좋은 한글 자료를 많이 만들었으면 좋겠습니다.
좋은 링크 소개해주시면 감사히 취합하도록 하겠습니다
자료
안드로이드 개발자 공식 블로그 (영문) 안드로이드 개발 공식 블로그이다. 안드로이드 스투디오 업데이트 뉴스외 다양한 안드로이드 관련 뉴스나 신규기능 소개 등의 글도 올라온다.
안드로이드 개발자 공식 사이트 (영문) 누구나 아는 사이트다. 안드로이드의 공식 문서 자료가 있다. API이나 대시보드를 참고하는데 많이 쓰지만, 둘러보면 권장 예제나 서포트 라이브러리 정보나 버그 리포팅 등의 정보도 잘 정리되어 있다. 최근에는 한글로 번역된 글도 늘어나고 있다.
안드로이드 오픈소스 프로젝트 – 이슈 트랙커(영문) 안드로이드 오픈소스 프로젝트의 이슈 트랙킹 사이트이다. 나는 실수한 것이 없는데, 이상하게 안된다 싶을 때 안드로이드의 버그인지 확인해보고 싶다면 이 사이트를 뒤져 보는 것을 추천한다. 전 세계의 개발자들이 이슈를 등록해서 안드로이드 팀을 괴롭히고 있으니까 내 궁금증이 이미 올라와 있는지 확인하자.
스택오버플로우(영문) 한국 사이트에서는 증상만 해결하는 미봉책들이 난무하지만, 스택오버플로우는 원인과 해결, 해결이 안된다면 이슈 트랙킹 정보라도 올라온다. 올바른 문제 해결을 원한다면 이 사이트를 참고하자. 물론, 모든 글이 좋은 건 아니다.
안드로이드 개발자 유투브 채널 (영문) 안드로이드 개발자를 위한 동영상 강좌나 뉴스가 올라온다. 구글 I/O 자료도 올라온다.
Udacity의 안드로이드 강좌(영문) 구글 안드로이드 팀의 직강 안드로이그 강좌가 유다시티(Udacity)에 올라왔다. 초보자 강좌부터 모두 준비되어 있다고 하니, 들어보자.
네이버 헬로우월드 블로그 (한글) 네이버 개발자들이 직접쓰는 개발 경험과 지식이 담겨진 블로그다. 한국의 훌륭한 개발자들이 시간과 노력을 들여서 쓴 글들이니 꼭 읽어두자. 블로그에는 서버와 클라이언트, 그 밖에 다양한 개발 관련 글이 들어있는데 안드로이드 글만 참고하고 싶다면 여기를 확인하자.
커뮤니티
수퍼드로이드 카페 (한국) ‘이것이 안드로이드다‘(한빛출판사, 2014) 저자의 카페다. 책도 좋지만, 책이 없더라도 카페에 저자가 직접 올린 강좌들을 통해 많은 내용을 얻어갈 수 있다. 책에 대한 무료 동영상 강좌도 제공한다. 안드로이드에 대한 근본적인 동작 원리에 갈증이 나는 개발자라면 이 카페를 방문해보자. 아쉽게도 요즘은 카페가 조용하다. 일 년 내에는 곧 개정판이 나올 것 같으니 기다려보자.
안드로이드 개발 팁팁팁! (한국) 페이스북에 있는 안드로이드 개발자 커뮤니티다. 공개 커뮤니티로 검색해서 가입할 수 있으며, 최신 뉴스 정보나 질문에 대한 답변들도 서로 활발하게 달아준다.
GDG Korea Android의 채팅방(한국) GDG(Google Developer Group)의 안드로이드 채팅방이다. 사람도 많고 신입도 환영해 준다. 문답도 활발한 것 같다.